Subjects:
- Air conditioning not working properly
- System pressure in the air conditioning system
- Diagnosing Using System Pressures
- Diagnosis based on pressure and temperature
- Overheating
– aftercooling
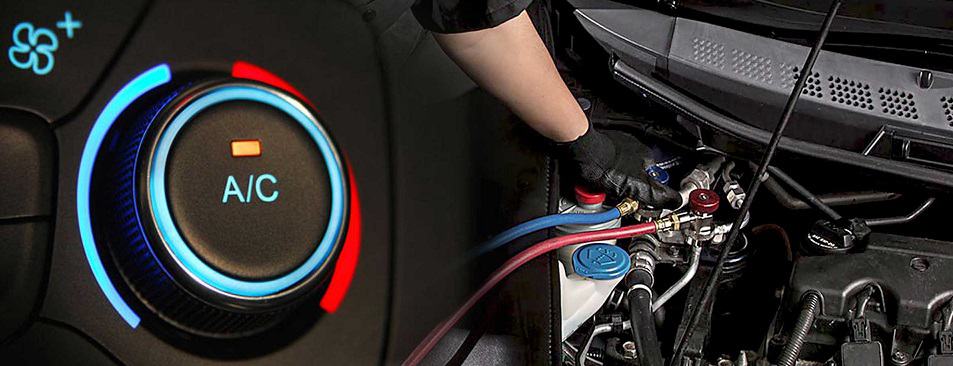
Air conditioning not working properly:
In case of complaints about poor functioning of the air conditioning we try to find out exactly what the complaint entails. We also try to collect more information about when the air conditioning was last serviced.
- Check the outlet temperature from the open ventilation grilles with the air conditioning switched on (preferably on the recirculation position or MAX position, here the recirculation is switched on automatically);
- In the case of insufficiently cooled air: check whether the air conditioner has not been serviced for more than four years. In that case, check whether there is sufficient refrigerant in the system;
- Check the pressures with the air conditioning system switched off and on and check the temperatures of the components. This is what the following paragraphs are about.
System pressure in the air conditioning system:
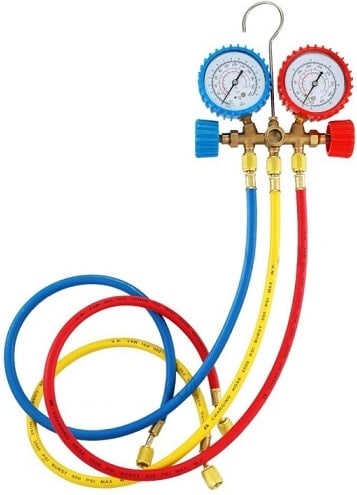
Pressure gauges allow us to check the pressure in the air conditioning system. The hoses must be connected to the service connections of the air conditioning system. When the nipples are tightened, the refrigerant will flow from the air conditioning to the pressure gauges. If the system is empty, the hands will rotate to indicate the system pressure. Such a pressure tester can be seen in the image below. The pressure gauges are also present at a service station (air conditioning filling device).
The pressure gauge in the picture contains two hands and three hoses.
- Blue is low pressure;
- Red is high pressure;
- The yellow hose in the pressure gauge has the function of adding nitrogen to the system for a leak detection.
If the air conditioning has been off for some time, the gauges will show approximately the same pressure after plugging it in. After starting the engine, the low pressure will drop and the high pressure will rise. The pressure is related to the temperature: when the pressure increases, the temperature also increases. And vice-versa.
- The low pressure drops due to the temperature reduction of the refrigerant after it flows out of the evaporator;
- The high pressure rises because the liquid refrigerant has heated up after leaving the condenser.
The pressure will stabilize after a few minutes. The evaporator does not cool down more than a few degrees above freezing point and the fan draws a constant outside air temperature through the condenser.
When the air conditioning no longer functions properly, we can measure the temperature in addition to reading the fault memory (possibly there is a fault in a pressure sensor), but also read the pressures with the manometers to make a diagnosis. The height of the pressure says something about the state of the system.
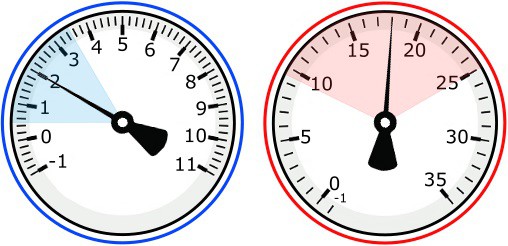
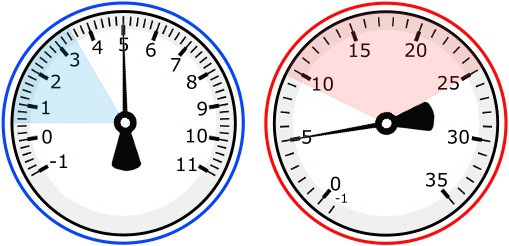
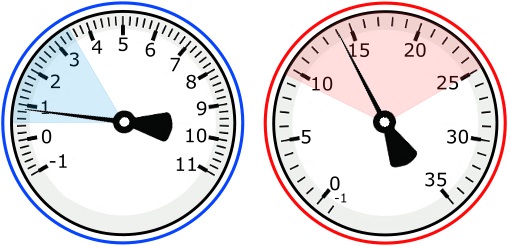
We see the pressures shown with a properly working system. The blue gauge indicates the low pressure (2 bar) and the red the high pressure (18 bar). The pressures are strongly dependent on the temperature: as soon as the temperature of the outside air, evaporator or other components changes, we see this immediately reflected in the pressure.
The colored areas on the dials indicate the operating pressures:
- Low pressure: between 0,5 and 3,5 bar;
- High pressure: between 9,5 and 25 bar.
We find in cars compressors of the following types of tilting plates:
- Fixed stroke: the low pressure (suction pressure) varies between 1 and 1,5 bar. The magnetic clutch turns the compressor on and off;
- Variable stroke with continuous flow: the tilt plate is mechanically adjusted. The low pressure is constant 2 bar, regardless of the compressor speed. A magnetic coupling provides the drive;
- Variable stroke with controlled flow: the tilt plate is electrically controlled. The suction pressure varies between 2 and 5 bar and depends on the ECU control. There is no magnetic coupling with this type of compressor.
To diagnose using the system pressures:
In the previous section we saw the system pressure of a properly functioning system. In the event of a malfunction, we can often see this reflected in the printing. Whether we are dealing with a leak resulting in too little refrigerant, or if too much has been filled during a service, you can find out by reading the pressures. In this section we discuss the possible causes of too high or too low pressure in the high or low pressure circuit. Note the compressor version!
Low pressure and high pressure 0 bar
- Refrigerant pressure is 0 bar, so there is no pressure in the system. The system is empty and must be checked for leaks before refilling the system.
Low pressure and high pressure equal
- The pressure does not change when the air conditioning is switched on or off: the air conditioning pump does not function. Presumably the pump does not start (ECU switch-on condition) or the magnetic coupling is defective.
Low pressure high, high pressure normal
- Opened expansion valve;
- Faulty heater valve in the heater housing causing warm air from the heater to enter the evaporator. Pinch off the coolant hose to the heater core to see if it affects the low pressure.

Low pressure high, high pressure high
- Too much refrigerant (measure and calculate superheating);
- The condenser is overheating due to a restriction (perhaps visible damage?) or the cooling fan is not working;
- Too much oil in the system: the system may have been recently topped up with too much oil;
- Air in the system.
Low pressure high, high pressure low
- Expansion valve has too large a passage, or remains open;
- Compressor defective. Try to run the compressor manually and check the resistance;
- Compressor variable flow control valve defective.
Low pressure low, high pressure low
- Too little refrigerant (measure and calculate superheating);
- Compressor defective. Check whether the pressure is correct when the compressor is switched off, but when it is switched on it gives these pressures;
- High-pressure side partly clogged (pressure when the system is switched off must be good).
Low pressure low, high pressure normal
- Warm air is present in the evaporator or interior due to a possible problem with the recirculation mode or the stove valves / air vents;
- The heater continues to provide warm air. Possibly due to a stuck heating valve;
- The evaporator is freezing due to a possible defect in the anti-icing switch or passenger compartment fan.
Low pressure low, high pressure high
- Too much refrigerant in combination with another problem;
- Restriction in the high pressure side, eg due to a bent pipe as a result of a collision;
- Clogged thermostatic expansion valve, due to a mechanical defect or due to icing.
In the last pressure measurement there is a low low pressure and a high high pressure. In the event of a restriction or blockage in the system, the low pressure can drop to 0 bar because the compressor draws a vacuum on the low pressure side. In that case, the low pressure can also slowly recover: after switching off the air conditioning, the low pressure rises remarkably slowly to the original pressure. A possible restriction (as a result of a bent pipe) can be detected with a temperature measurement. The temperature measurement is covered in the next section.
Diagnosis by pressure and temperature:
As described in the first section, modern continuous flow variable stroke air conditioning compressors adapt the pressure to the conditions. The low pressure (suction side) is a constant 2 bar, regardless of the engine speed. When we measure 2 bar, it does not say much about the functioning of the system. We can diagnose this with temperature measurements.
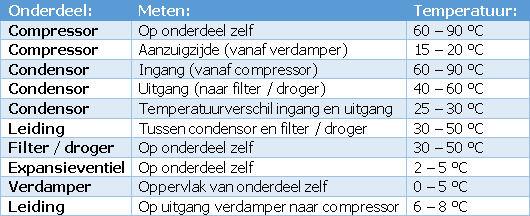
The table below describes the prescribed temperatures for a properly functioning system. The temperatures are guide values of an air conditioning system that has been switched on for at least 10 minutes and at room temperature. At extremely high outside air temperatures, the temperatures and pressures in the air conditioning system may deviate.
- A good diagnosis can be made with a temperature measurement;
- The compressor temperature must not exceed 90 °C: the oil may start to boil;
- A temperature difference of 30°C between the condenser inlet and outlet is OK. A lower temperature can enter the condenser due to a bad passageway, causing it to work less well.
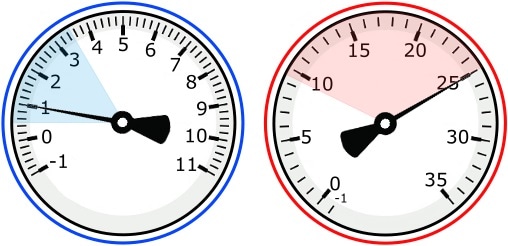
The following figures show a low pressure of 2 bar, a high pressure of 18 bar and a temperature of 6°C on the suction line after the evaporator (evaporator outlet to the compressor).
In the evaporator, the refrigerant changes from saturated vapor (vapour-liquid) to fully gaseous. The temperature of the refrigerant rises from 2-5 °C (from the expansion valve) to 6-8 °C at the outlet of the condenser.

Overheating:
With the measured pressure and temperature we can calculate the superheating. The superheating is the difference between the suction line temperature and the evaporation temperature of the refrigerant.
- With a properly functioning system, superheating is around 5 to 6 °C
- Overheating more than 6 °C: the system fill quantity is too low. When emptying the system, for example, 200 grams will be removed from the system, while the maximum filling quantity is 800 grams;
- Overheating less than 5 °C: the system fill quantity is too high. There is (much) more refrigerant in the system than recommended by the manufacturer.
If you have complaints about poorly functioning air conditioning, we can go through the following five steps to be able to say something about the condition of the air conditioning:
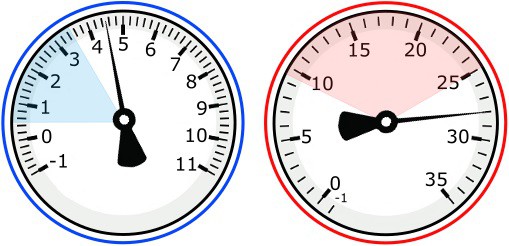
- When the air conditioning is switched off, the high and low pressures are both 6 bar. This is OK;
- When the air conditioning is switched on, the low pressure drops to 2 bar. This pressure is regulated by the variable compressor. The high pressure depends on the condenser temperature: here we measure 12 bar.
- We measure the temperature at the outlet of the evaporator with an infrared thermometer: this is 6 °C;
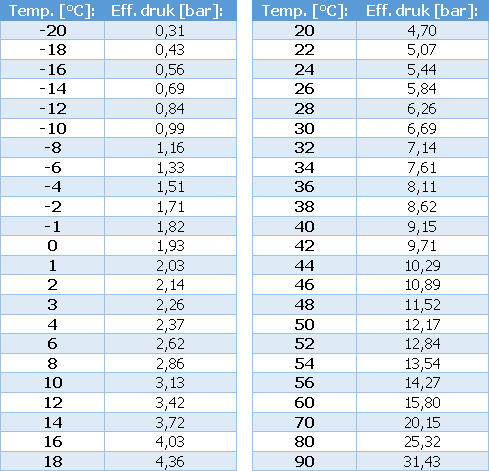
- We look up the evaporation temperature of the refrigerant that corresponds to the value we measured on the low-pressure pipe: at the pressure of 2 bar, the evaporation temperature is 1 °C;
- We calculate the superheating by subtracting the evaporating temperature from the suction pipe temperature: (6 – 1) = 5 °C.
With a properly working system, the overheating is around 5 to 6 °C, so based on this measurement we can conclude that the air conditioning is in order.
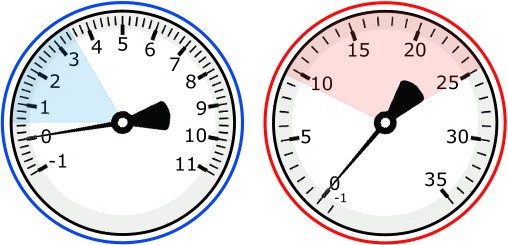
In this situation we calculate the overheating of a malfunctioning air conditioning system:
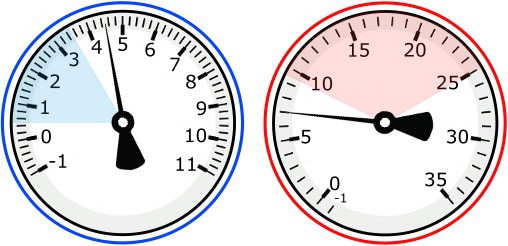
- When switched off, the pressures are 6 bar. There is refrigerant available;
- With the engine and air conditioning switched on, the low pressure drops to 2 bar and the high pressure to 12,0 bar. The pump switches on and the air conditioning should in principle now cool properly;
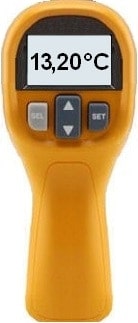
- We measure a temperature of 13,2 °C on the outlet pipe of the condenser with an infrared thermometer (see picture). This is significantly higher than the 7 °C in the previous paragraph;
- The low pressure is again 2 bar, so the evaporating temperature of the refrigerant is 1 °C;
- The superheat is: (13,2 – 1) = 12,2 °C.
We see a much higher temperature difference here than in the example with a properly functioning air conditioner. This also reduces the temperature difference with the flowing air. The interior air is therefore less effectively cooled. The passengers in the car notice this as a malfunctioning air conditioner. The cause is a fill quantity that is too low. The system still functions with the amount of refrigerant present, but no longer as one would expect.
Aftercooling:
In addition to the temperature measurement at the condenser, the aftercooling can also be determined. By subcooling we mean the difference in condensing temperature and the temperature at the outlet of the condenser. This allows us to determine, among other things, a filling quantity that is too high or too low, and we know for sure that liquid is coming out of the condenser. The aftercooling is usually between 5 and 15 °C.
- No aftercooling means too little refrigerant;
- Too much aftercooling is caused by too much refrigerant.
To determine the aftercooling we follow the following steps:
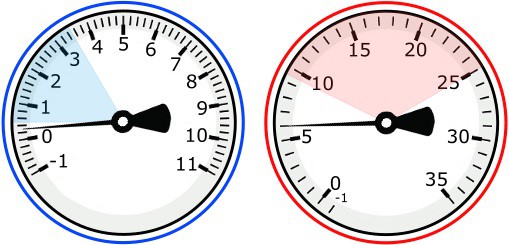
- When the system is switched on, we determine the condensing temperature of the refrigerant in the outlet pipe at the condenser: in the table we find a condensation temperature of 12 °C at 50 bar;
- We measure a temperature of 40 °C at the outlet of the condenser with the thermometer;
- We calculate the aftercooling as follows: aftercooling = condensing temperature – condenser output temperature, so (50 – 40) = 10 °C. This temperature is OK.
Related page: